Creating a personal portfolio website is not just about putting together a digital resume—it’s about crafting an online identity that reflects your professional expertise, values, and vision. For me, the journey of designing and developing my portfolio site was a creative process that blended technical skills with a deep desire to present my professional insights and career tips in an engaging and functional way. In this blog post, I’ll take you through the steps and technologies I used to create a portfolio site that both represents my work and acts as a resource for others.
Step 1: Defining the Purpose and Structure
The first step in any creative project is understanding its purpose. For my portfolio, I wanted it to serve as a space where visitors could learn about my background, see my professional accomplishments, and gain valuable insights from the articles I share. As a Doctor of Information Technology with a passion for both technology and education, I knew that my website should reflect not just my academic achievements, but also my desire to help others succeed in their careers.
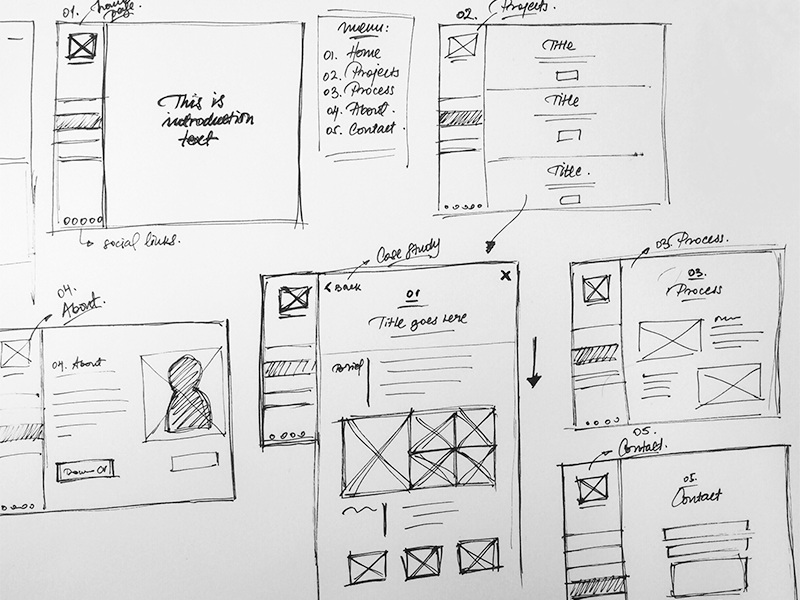
With this vision in mind, I focused on a simple yet powerful structure:
- Home Page: A welcoming introduction with a brief summary of who I am and what I offer.
- About Page: A more detailed overview of my qualifications and professional experience.
- Portfolio Page: A showcase of projects, papers, and presentations that demonstrate my skills.
- Blog Section: A place to share insights, articles, and career tips for fellow professionals.
- Contact Page: A form for visitors to reach out, along with links to my social media profiles.
Step 2: Choosing the Right Technologies
With a clear purpose and structure in mind, the next step was selecting the right tools and technologies to bring the site to life. I wanted the site to be responsive, accessible, and easy to maintain, so I chose a stack that offered flexibility and performance.
Platform and Framework:
After considering a few options, I decided to build the site using WordPress. Its user-friendly interface, extensive plugin ecosystem, and customization options made it the perfect choice. I also wanted full control over the design, so I used a custom theme rather than relying on pre-built templates. This gave me the freedom to tailor every aspect of the site to my specific needs.
Frontend Design:
For the frontend, I used a combination of HTML5, CSS3, and JavaScript to build a clean, modern, and minimalist design. I focused on creating a smooth user experience with responsive layouts that adapt to different screen sizes and devices. I also implemented CSS Grid and Flexbox for layout flexibility, ensuring the site looks great on both desktops and mobile devices.
Backend Functionality:
For the backend, PHP played a central role, as it powers WordPress. Custom plugins were added to enhance functionality—specifically, a blog management system and a contact form that integrates with my email. To ensure the site remains fast and secure, I incorporated caching and security plugins, like Wordfence.
SEO and Performance:
Since a website is only valuable if people can find it, I paid special attention to Search Engine Optimization (SEO). I used Yoast SEO to optimize content and improve rankings on search engines. Additionally, I employed Google Analytics to track site performance and user interactions, which helps me understand my audience and refine my content strategy.
Step 3: Designing the User Experience (UX)
One of the key components of a great portfolio website is providing a seamless user experience. I wanted visitors to feel engaged and navigate the site effortlessly. To achieve this, I focused on:
- Simple Navigation: A clear and intuitive menu with easy access to all important sections of the site.
- Visual Consistency: Using a consistent color scheme and typography that reflects professionalism and clarity.
- Engaging Content: Including high-quality images, clear descriptions, and case studies that provide real insight into my expertise.
Step 4: Building the Blog Section
As someone who enjoys sharing professional insights, I knew the blog section of my portfolio site would be crucial. The blog would be the space for me to connect with a wider audience, provide valuable career tips, and discuss industry trends.
I created a content strategy that focused on writing in-depth, actionable posts about the intersections of technology, career development, and leadership. Each post would be rich with insights and easy to digest. The design of the blog section emphasizes readability, with a clean layout, large fonts, and plenty of white space. I also made sure to include share buttons and comment sections to foster interaction and engagement.
Step 5: Launching and Refining
Once the website was live, I began promoting it through my social media channels, email newsletters, and word-of-mouth. Feedback from early users helped me make important refinements, from improving the load time to adding additional features like a newsletter signup form.
I continue to refine the site with new content, blog posts, and updates as my professional journey evolves.
Conclusion
The creative process behind my portfolio site was an enriching experience that combined my technical skills with my passion for sharing knowledge. By using WordPress, modern frontend technologies, and focusing on a user-friendly design, I was able to create a site that reflects my professional identity and offers value to visitors. As my career progresses, I plan to keep evolving the site—adding new content, refining the user experience, and making sure it always aligns with my vision of providing professional insights and career tips.
This portfolio site is not just a showcase of my work, but a tool for connection and growth, both personally and professionally.
Share this:
- Click to share on Facebook (Opens in new window) Facebook
- Click to share on X (Opens in new window) X
- Click to share on LinkedIn (Opens in new window) LinkedIn
- Click to share on Reddit (Opens in new window) Reddit
- Click to share on Pinterest (Opens in new window) Pinterest
- Click to share on Pocket (Opens in new window) Pocket
- Click to share on WhatsApp (Opens in new window) WhatsApp
- Click to email a link to a friend (Opens in new window) Email